
Here is the tutorial for the SnuggaRoo .
(my craft from the SYTYC audition) 
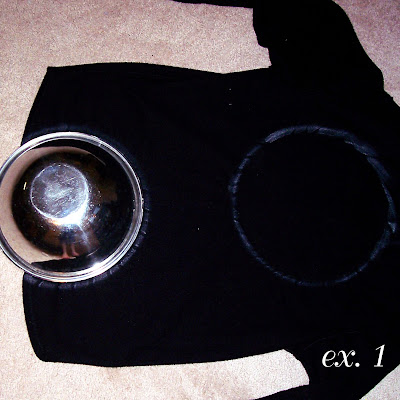 Turn fleece jacket inside out and trace shape.

You will want two whole circles,

You will also want to cut shapes for the ears.
(Sorry about the pictures...they are horrible!)
Materials:
old fleece jacket or blanket
felt
needle and thread
pins
sewing machine~ optional
 Turn fleece jacket inside out and trace shape.
I used a large bowl to make the round shape, and a large book to make the rectangle head shape.
I used chalk to mark the shape onto the black fleece.

You will want two whole circles,
a circle for the pouch (line up with the finished bottom of the jacket- you will want it a little shorter than the other circles)
and cut a length of the finished bottom hem of the jacket for the handle.

You will also want to cut shapes for the ears.
I used a coffee mug to get two round circles.

Fold each circle in half, then cut in half and pin.
 Sew around the round edges of the half circles, leaving the strait part open.
Then turn inside out and sew around the edges again.

Now, it's time to pin everything together!
 Pin in place. Pinning all around the edges of the circle.

Sew with your sewing machine (or by hand) all around the edges, leaving a small opening on the bottom- so that you can turn inside out and stuff.
 Turn right side out and stuff.
 You should have a pocket on the back, with ears and a handle on top.

Here is the fun part!

Fold each circle in half, then cut in half and pin.
 Sew around the round edges of the half circles, leaving the strait part open.
Then turn inside out and sew around the edges again.

Now, it's time to pin everything together!
This part...you need to be very careful!
First, I pinned the pocket to the back side circle. Lay the back side facing right side up, then pin the pocket on facing right side up on top of it.
Now we are going to make a sandwich:)
Place the front circle down facing right side up,
line up the handle (curved side down) in the top center of the front circle.
place the two ears on each side of the handle (curved side pointed down towards bottom of circle) with the unfinished edges lined up with the top edge of the circle.
Lastly, place the back side circle (with the pocket) face down on top of the front circle, sandwiching the handle, ears and pocket inside.
The outsides should be the wrong side of the circles.
 Pin in place. Pinning all around the edges of the circle.
Sew with your sewing machine (or by hand) all around the edges, leaving a small opening on the bottom- so that you can turn inside out and stuff.
 Turn right side out and stuff.
Sew the opening closed by hand.
 You should have a pocket on the back, with ears and a handle on top.
Here is the fun part!
Putting on the face!
I just used felt scraps that I had.
 Cut the shapes that you like, then stitch them on.
I just used felt scraps that I had.
 Cut the shapes that you like, then stitch them on.
I used a blanket stitch.

I added a fleece nose (also sewn on using blanket stitch), and used a split stitch to embroider the line coming down from the nose.

I embroidered the eyes on using a satin stitch.
 Finished!


I added a fleece nose (also sewn on using blanket stitch), and used a split stitch to embroider the line coming down from the nose.
I embroidered the eyes on using a satin stitch.
 Finished!
Perfect for a lazy afternoon spent reading your favorite book!
(**p.s. I found the best embroidery instructions here.**)
6 comments:
Thanks for the tutorial!! Love these, they are adorable.
You're welcome! I'm glad you liked it! Thanks!
These are so cute!! Can't wait to give them a try. I love the pocket on the back. Super job! ; )
Thanks!
oh my goodness...does it get any cutter than that? I think not!!
Super great job!!!
Thanks so much!
Post a Comment