Monday, December 17, 2012

Another Version of The Easiest Advent Calendar... Ever!

I don't know if you remember, but last year I posted an idea for "The Easiest Advent Calendar...Ever!". It was a simple project of stamping the numbers 1-25 on wooden clothes pins.  

Last year, I attached magnets to the backs and stuck them to the refrigerator with fun activities or ideas for each day until Christmas.

The Easiest Advent Calendar...Ever! | livingwiththreemoonbabies.blogspot.com
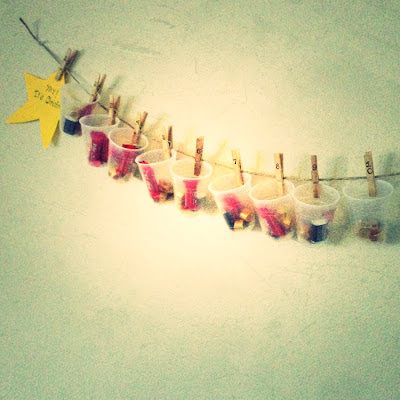
This year, I did something a bit easier and lazier!  I pinned a piece of twine to the wall and clipped on cups (recycled from when my girls had their lemonade stand this past summer) and filled the cups with sweet treats for each day.  I think it would have looked even cuter with paper bags, but I didn't have any.

Anyway, I'm sure I'll do something different with the numbered pins next year too.  Hmmm....

How do you count down the days to Christmas?  I can't believe we have only about a week left!

Wednesday, December 5, 2012

Saturday, November 24, 2012

Saturday, November 17, 2012

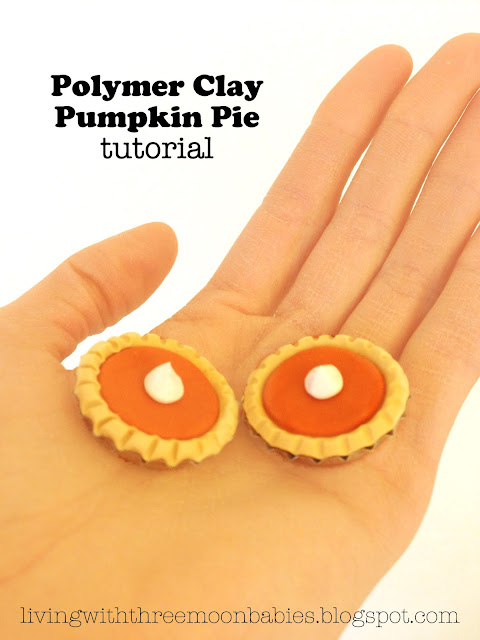
Polymer Clay Pumpkin Pie: Tutorial

Polymer Clay Pumpkin Pie Tutorial | livingwiththreemoonbabies.blogspot.com

What you need:
  • bottle cap
    • Unused and flattened type is the best.  You can find them at craft stores, Amazon, or on Etsy.  You can also look at stores that cater to home brewing.
  • beige/crust colored polymer clay
  • orange/pie colored polymer clay
    • I mixed orange, brown, and gold to get a color I liked.  I have also seen people mix in real pumpkin pie spices to make it look more realistic!
  • white for the whipped cream
  • needle tool or something to crimp the edges of the crust
  • liquid polymer clay to strengthen bond between clay pieces


As I mentioned before, I added some brown to my orange to get a more realistic pumpkin color.

I still wasn't happy with the color, so I added some gold too.

 I flattened the clay, then used a 1 1/4 inch circle cutter to cut a piece of beige and orange.  I used a tiny, about 1/4 inch, circle cutter to cut a piece of white to use for the whipped cream.

 Center and place the piece of beige/crust colored clay in the bottle cap.  I added some liquid polymer clay between the two to secure the bond.

 Roll the orange/pumpkin colored clay in a ball.

 Place the orange ball in the center of the beige piece of clay.

 Press and flatten the orange clay ball.

 Press the side of the needle tool in increments around the pie to crimp the edges of the crust. 

  Try not to indent the orange portion of the pie.

 Roll the white clay into a ball.

 Pinch the top of the white ball to form a teardrop shape.

 Add a drop of liquid polymer clay to the center of the pie.

 Place the white clay in the center of the pie with the pointed side up and squishing it down a tiny bit.

 Bake according to clay directions.

 And...your pies are finished!

You can use them as festive hair bow centers, to decorate napkin rings, as magnets, or even glue on a bail to create a pendant!

My 6 year old daughter helped me make the pies and made two of her own.  She likes to use them to feed her Lalaloopsy doll!

Hope everyone has a happy Thanksgiving!

Thursday, November 15, 2012

More Ornaments

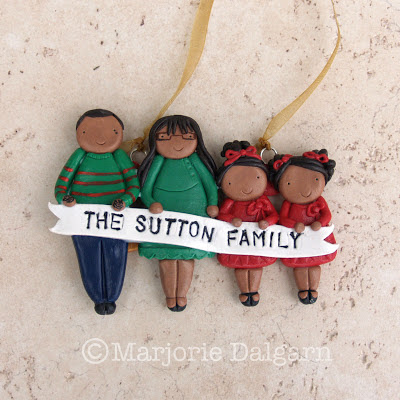
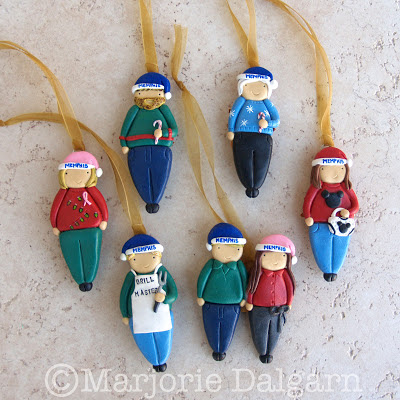
Here are a bunch of custom ornaments I just finished...
Aren't they cute?!

Meet My Family Custom Polymer Clay Ornaments | livingwiththreemoonbabies.blogspot.com

Love all of the different personalities represented!

Monday, November 12, 2012

PINspiration: Pink Peacock Feather Earrings

I pinned this photo on Pinterest:

...and it inspired me to make my beaded peacock feather earring pattern in pink!:
Beaded Peacock Feather Earrings | livingwiththreemoonbabies.blogspot.com

P.S.  You can get the pattern for these earrings in my kindle book.

Sunday, November 11, 2012

Friendship Bracelet: Tutorial

Friendship Bracelet Tutorial by livingwiththreemoonbabies.blogspot.com

Here is a really easy friendship bracelet tutorial!
They are easy enough for kids to make too!

Friendship Bracelet Tutorial by livingwiththreemoonbabies.blogspot.com
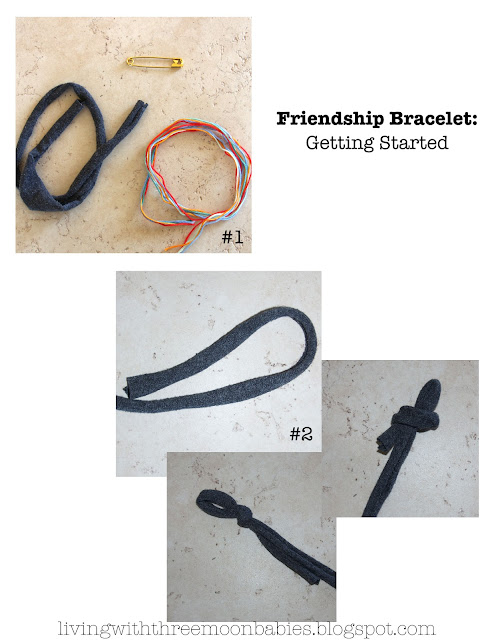
Getting started...

#1. You will need:
  •  a long piece of t-shirt yarn in any color (you can also make by cutting a long strip of t-shirt about an inch wide and pulling the ends to stretch and lengthen)
  • embroidery floss/thread in as many colors as you choose
  • a safety pin
#2. Tie a loop at one end of the t-shirt yarn with an overhand knot

Friendship Bracelet Tutorial by livingwiththreemoonbabies.blogspot.com
             
The Knots...

#3. Safety pin the looped piece of t-shirt yarn to your knee

Cut the embroidery floss in long pieces (around 40 inches in length of each color, depending on wrist size and the amount of different colors used)

Tie (with a double knot) the group of embroidery threads to the top of the piece of t-shirt yarn as close to the knot of the loop as possible, leaving a couple inches of length on one end and the bulk of length on the other

#4. Hold down the long portion of the t-shirt yarn and all pieces of embroidery thread, including the short ends, except for length of embroidery thread in the color you want to show up

Take the chosen color and cross over everything else, making a 4 shape

Wrap around everything else and come up through the loop created by the chosen color of embroidery thread and pull the thread up towards the safety pin/ top loop to tighten the knot

Repeat this way of knotting (a forward knot) until you want to change colors

The entire bracelet is made of forward knots in alternating colors


Friendship Bracelet Tutorial by livingwiththreemoonbabies.blogspot.com
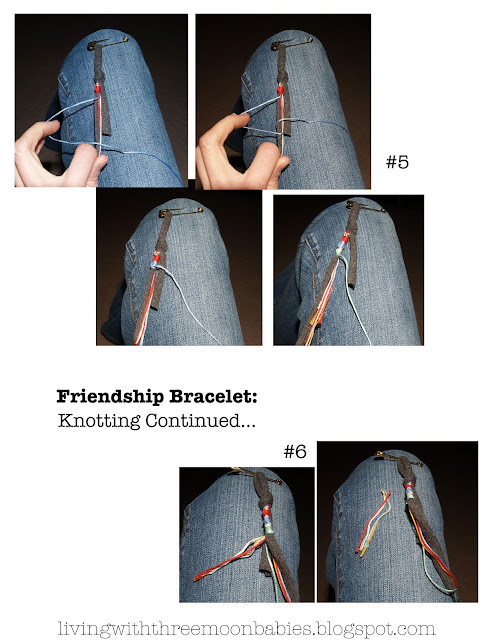
Knotting Continued...

#5. Continue knotting, alternating colors as desired
#6. Once you have knotted about an inch or two down in length, you are free to cut off the short ends of the embroidery floss

Do not cut the long pieces of thread or t-shirt yarn off!

Friendship Bracelet Tutorial by livingwiththreemoonbabies.blogspot.com
Finishing Up...

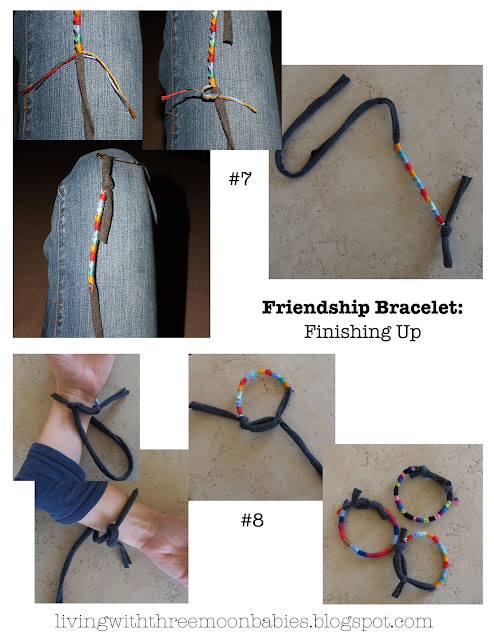
#7. After you have reached the desired length of your knotting, you split the amount of embroidery threads in two and tie a triple knot around the t-shirt yarn

Trim the ends of the embroidery thread

#8. To tie onto your wrist, slip the left over length of t-shirt yarn through the top loop and knot

Cut off excess length of t-shirt yarn on both ends (near the top loop and the end piece)

And...you are...FINISHED!

The good thing about using the t-shirt yarn is that it has a bit of stretch to it, so the bracelets are easy to slip on and off....making them easier to share and give to friends!

These look so cute worn in bunches!

Have fun and feel free to let me know if you have any questions!

Tuesday, November 6, 2012

The Midas Ring

Hi everyone!
Guess what....
I have a fun, new beading pattern for you!

I have been loving glittering gold lately...
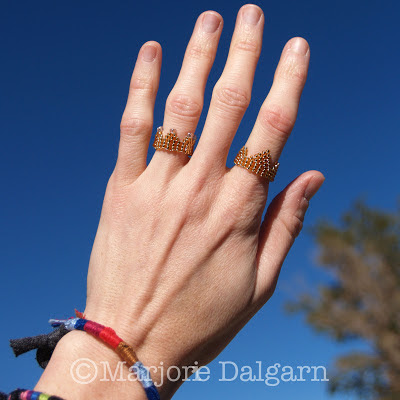
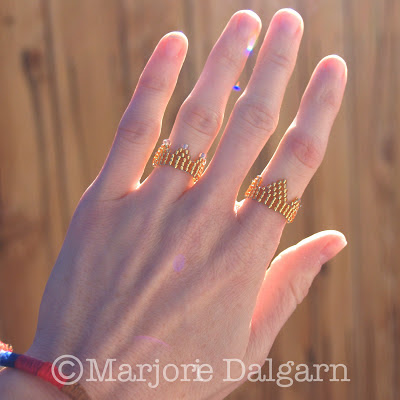
so I decided to create this crown ring.  

The Midas Ring | livingwiththreemoonbabies.blogspot.com


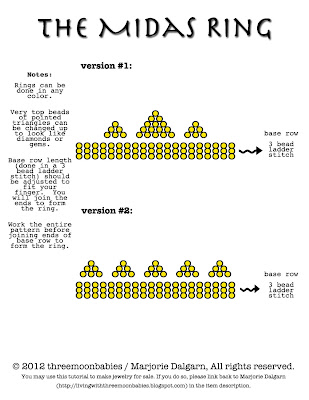
There are two versions of the pattern.

The Midas Ring | livingwiththreemoonbabies.blogspot.com


This pattern is completed using a ladder and brick stitch.  
You will need a beading needle, beading thread, and seed beads.  
I used 11/0, round, silver-lined, topaz seed beads to get the glittering, gold look:)  
I also used 8/0, round, transparent, rose-colored seed beads
 on the tips of the second pattern to get a different look.  
You are free to experiment with different colors and sizes of beads!

You can get the PDF download for this pattern HERE.
The Midas Ring Pattern by livingwiththreemoonbabies.blogspot.com

The Midas Ring | livingwiththreemoonbabies.blogspot.com

Hope everyone enjoys the new pattern!
As always, please feel free to contact me with any questions.

Thursday, November 1, 2012

Halloween 2012

Hi!  Hope everyone had a fun Halloween yesterday!
Here are a few pictures of my kids in their finished Halloween costumes.
A Dia de los Muertos bride, Dobby from Harry Potter, and a Lalaloopsy doll:


 The Dobby mask ended up being super uncomfortable, so we cut out the ears and attached them to elastic...much better!

Wednesday, October 31, 2012

On the Front Page!


Yay!  My Polymer Clay Decorated Pumpkin Tutorial made it to the front page of Instructables!
instructables front page

Nevada Day Costumes 2012

Nevada Day is on Halloween so at my kids' school, they have to wear Nevada themed costumes.
This year Charles went as a miner and Sienna as a giant piece of silver!


P.S.  You can see some of their past Nevada Day costumes HERE.

Tuesday, October 30, 2012

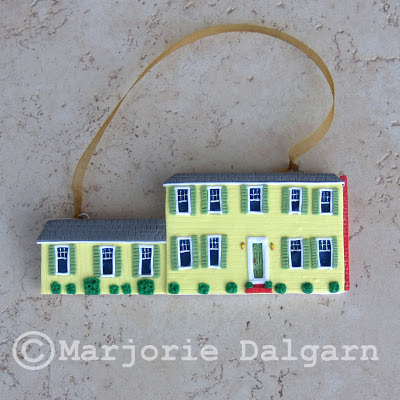
Custom House Ornament

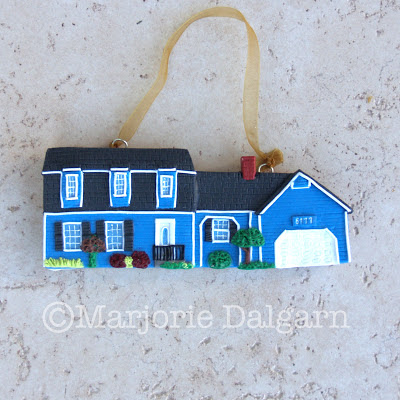
Recently completed...
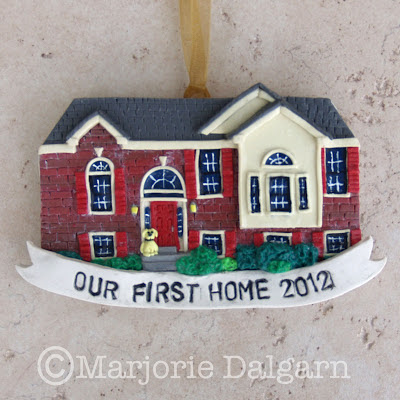
another custom house ornament:

Custom House Ornament

P.S.  I will only be accepting ornament orders to be delivered before Christmas for a few more days!
I plan to close my shop this Friday, November 2, in order to catch up on current orders and make sure they are ready and delivered before Christmas.


Saturday, October 27, 2012

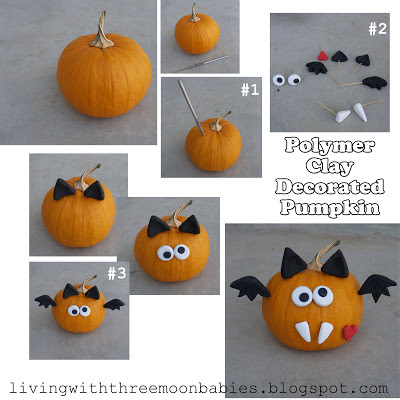
Polymer Clay Decorated Pumpkin

We made a polymer clay decorated pumpkin!
And...I'll show you how to make one too!
This project kind of reminds me of a Mr. Potato Pumpkin Head:)
Polymer Clay Decorated Pumpkin
 I made mine look like a bat, but really...the possibilities are endless.
You can even just make a bunch of teeth and add to a carved pumpkin (like this).

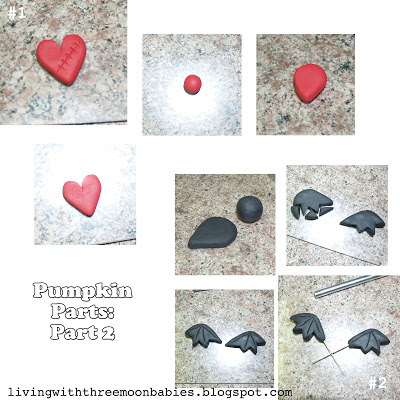
The Pumpkin Parts
First...make all of the parts.  
You will only need polymer clay and either toothpicks or skewers.
You will want the toothpicks to be thick and of good quality.  
The toothpicks I used were thin and flimsy, and I did have some break when pushing into the pumpkin.

For the bat in my example, I made (pictured above):
#1- teeth
#2- ears
#3- eyes

The Pumpkin Parts: Part 2
I also made (pictured above):
#1- a heart with a scar
#2- bat wings

Bake according to clay directions.

I baked the parts with the toothpicks in them.  Remember how the parts will be attached, so you put the toothpicks in the appropriate places.  You also could poke the hole for the toothpick, bake the clay, and re-attach the toothpick after the clay has been hardened.  Another option would be to drill a hole for the toothpick in the hardened clay, but remember you do want the toothpick to fit snugly in the hole, so you don't have wobbly parts!


Polymer Clay Decorated Pumpkin
To attach the polymer clay parts to the pumpkin, I poked a guide hole using a needle tool.  This will make it easier to push the toothpick into the pumpkin.
Pictured above:
#1- poke the guide hole
#2- gather your parts
#3- attach the polymer clay parts to your pumpkin

...and that's it!
Another super simple polymer clay project!

 Even kids can do it!
My 6 year old, Sienna, made the pumpkin below (except for the little top hat):
Sienna's Pumpkin

Hope everyone has fun with this project!
Feel free to contact me if you have any questions.
Thanks for stopping by my blog!